As per our agreement I must divulge when I've purchased an 'extra' item for myself. It happened last week, BUT I CAN EXPLAIN! (A girl can always justify a purchase am I right?)
When we last bought some things at Old Navy we were given a coupon to redeem between November 17th - 21st that gave us $30 off a $60 purchase. Let's do the math... that's $30 worth of stuff for free. I get free. We really like Old Navy jeans for our boys so we decided that we would reach the $60 by buying them each 2 pairs of jeans (they were on sale 2 for $28.) But that left the total short of $60 and of course we wanted the $30 discount. What choice did I have but to top off the bill with something for myself? I know, a noble act. I found an adorable yellow tank that was $3 and to go with it I found a slim zip up cream cardigan. The 2 will look great paired together with a skinny belt around the tank. I had also tried on a great coral dolman sweater that I really liked but since I was obeying my shopping ban I decided to put it back as I had already reached the $60 total. When I took the cardigan to the till and realized it was further marked down, as was the dolman sweater I threw my ban to the wind and grabbed that too - I mean a cardigan for $7 and a sweater for $8? I think so! You understand right? You would have done the same thing right?
Because I really am taking this shopping hiatus seriously I decided I wouldn't wear any of it and gave the bag to Neil to wrap and put under the tree or give me for my birthday. So there, I've come clean. But I still think we got a great deal!

November 28, 2011
November 25, 2011
November 23, 2011
my dad is a rock star
No really, he actually is.
If you are my friend on Facebook you may have already seen this but I have to share this video again. I get goosebumps whenever I watch it, I'm so proud! My dad has been playing drums since he was a youngin (he was the drummer in a popular rock band in Cape Town in the 60's) and decided to pick it up again many years later, taking proper lessons. It was a goal of his to learn this (very technical) song, one of his favorites. I spent many nights falling asleep to him pounding away in his drum room in the basement. I think I can sing this song almost as well as he can drum it. I kid.
But enough outta me, I encourage you to watch this video right till the end. It's impressive. He's impressive. I like him.
If you are my friend on Facebook you may have already seen this but I have to share this video again. I get goosebumps whenever I watch it, I'm so proud! My dad has been playing drums since he was a youngin (he was the drummer in a popular rock band in Cape Town in the 60's) and decided to pick it up again many years later, taking proper lessons. It was a goal of his to learn this (very technical) song, one of his favorites. I spent many nights falling asleep to him pounding away in his drum room in the basement. I think I can sing this song almost as well as he can drum it. I kid.
But enough outta me, I encourage you to watch this video right till the end. It's impressive. He's impressive. I like him.
November 22, 2011
DIY boot socks
Let me preface this post by saying if I had taken time to plan this project out I would have purchased socks that actually match. I used what socks I had on hand and realize now that this was a successful job if I don’t intend on taking my boots off when I go anywhere. Really, I’m going to come over to your house, take my boots off and walk around like that? Well actually I probably would.
I have been ogling boot socks lately. I see them everywhere and decided I must get a pair. Because I have put myself on a shopping ban for the time being I decided I had either make some (as seen on pinterest) or go without. I remembered this little beauty who had been dissected for this project and figured she’d work perfectly for boot socks.

I cut the arms off, stuck my sock inside one so right sides are together and then serged the 2 together in sock-making-matrimony.


As I have mentioned the intermediate result is a little unattractive but picture a matching sock and that is remedied.

The end result however is fantastic: cute boot socks, in 3 minutes and for free – well, for free if you don’t ever want to take your boots off. Add a few bucks for a matching pair of socks and it’s still an inexpensive alternative to purchasing new ones from the store.
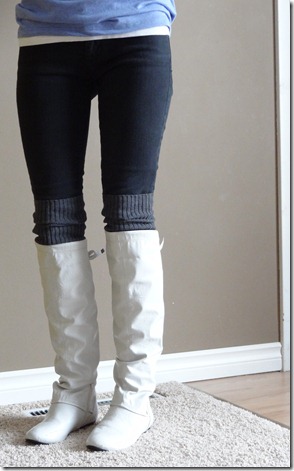

Think of all the thrift store sweaters just waiting to be turned into boot socks!
I have been ogling boot socks lately. I see them everywhere and decided I must get a pair. Because I have put myself on a shopping ban for the time being I decided I had either make some (as seen on pinterest) or go without. I remembered this little beauty who had been dissected for this project and figured she’d work perfectly for boot socks.

I cut the arms off, stuck my sock inside one so right sides are together and then serged the 2 together in sock-making-matrimony.


As I have mentioned the intermediate result is a little unattractive but picture a matching sock and that is remedied.

The end result however is fantastic: cute boot socks, in 3 minutes and for free – well, for free if you don’t ever want to take your boots off. Add a few bucks for a matching pair of socks and it’s still an inexpensive alternative to purchasing new ones from the store.


Think of all the thrift store sweaters just waiting to be turned into boot socks!
November 21, 2011
Dior FOTD

I rave a lot about my Urban Decay Naked palette and about the numerous MAC eyeshadows I own, but I have neglected to mention another one of my favorites – my Dior eyeshadow compact. I hadn’t used any Dior cosmetics until I took my makeup artistry course last year. There’s a reason this line is high end. With one application I knew I was in love, and in trouble. The first Dior product I own is an eyeshadow quintet called Earth Reflection 609. The quality is what you would expect for something with a price tag of $59. Words like smooth, buttery and silky all come to mind, it's a beautiful product.


clockwise from top left - gold, taupe, champagne, dark brown, icy pink middle
without and with flash
The colors in this quintet are quite shimmery yet I find them very wearable. They are highly pigmented while being natural and soft. From this compact alone you can create a light daytime look or add drama for an evening out. It's a great compact for travel as it's all you'd need.
I have had this compact for over a year and although it's not one I use constantly it is a little treat to pull out every so often. I have been reaching for it more and more lately and find that it does offer something special to my makeup collection. With a hefty price tag I don't expect everyone to run out and purchase one but if you have the chance to use a Dior eyeshadow I recommend the experience.
without and with flash
The colors in this quintet are quite shimmery yet I find them very wearable. They are highly pigmented while being natural and soft. From this compact alone you can create a light daytime look or add drama for an evening out. It's a great compact for travel as it's all you'd need.
I have had this compact for over a year and although it's not one I use constantly it is a little treat to pull out every so often. I have been reaching for it more and more lately and find that it does offer something special to my makeup collection. With a hefty price tag I don't expect everyone to run out and purchase one but if you have the chance to use a Dior eyeshadow I recommend the experience.
In this FOTD I used the light brown all over the lid with the dark brown in the crease. I extended those same colors onto the bottom lid and then blended a little of the gold color over the center of my eyelid and then over the inner corner. I skipped eyeliner on the upper lid but lined the waterline with a black pencil. I like to use the lightest champagne color as a cheekbone highlighter. It's not too shimmery and adds a beautiful glow to the face.


Face
MAC Face and Body foundation
MAC MSF Natural in Light Plus
MAC Powder Blush in Well Dressed
Dior champagne eyeshadow to highlight
Eyes
Dior 5 colour eyeshadow in Earth Reflection 609
Maybelline Unstoppable eyeliner on waterline
Loreal Voluminous mascara
Lips
MAC Hue lipstick (my current favorite My Lips But Better color)
November 18, 2011
please pass the corn(ice)
Ok, the title’s a stretch but at least you got a laugh. Or are totally confused. THIS, my friends, is a cornice. I had no idea that these things had a name other than that-bar-thingy-that-goes-across-the-top-of-the-window, but apparently they do. And it’s cornice.
During my visit to my sister’s we went to Joann to look for fabric. I was looking for something I could use to make a window treatment in the boy’s room. My mom found this little number and the green, yellow and brown combination was perfect. I had intentions of making faux roman shades as I did in this project so I bought enough fabric for 2 panels, the length of each window. However, while perusing through pinterest one day I saw this tutorial and thought it was totally adorable and totally do-able. I decided to build a cornice for the boy’s window instead. Because the fabric I bought was cut into 2 panels I had to sew a seam down the middle to make the fabric wide enough to fit the window. Simple. The rest of the project was just as easy. Neil found a board in the garage and cut it to the length we needed. I used a staple gun to wrap the board in batting and then in fabric. *TIP* My sister passed on a handy hint for recovering things. Always staple on the batting and the fabric separately. It does mean twice the staples BUT should you ever want to change the fabric you only have to remove the fabric layer while the batting stays intact, so you don’t have to redo the entire thing! Pretty smart.
After the long board was wrapped and stapled I covered the 2 side pieces and then Neil helped me fasten it all together with 2 L brackets. We then used 2 more L brackets to secure it to the window. Easy peasy. I’m not much of a tutorial maker (I always forget to take pictures of steps along the way!) so if you are completely lost and you’d like to see the tutorial I followed here is the link.
And here is the finished product. I’m pretty happy with how it turned out. I think it adds just enough detail to the room.


Because I took the pictures looking up it looks like the cornice doesn't quite cover the shade hardware at the top of the window. Let me assure you it does. We hung the cornice as low as possible, flush with the top of the window trim, making sure that it covered the top of the shades. If I were to make it again I would probably make the cornice a couple inches wider but I'm happy with this one regardless.
The best part is because the cornice did not use as much fabric as the roman shades would have I had a lot of fabric left over. Just enough in fact, to make 2 matching pillow cases for the beds. How great is that?
I'm just working on a few more touches and then the room will be complete! Stay tuned.
During my visit to my sister’s we went to Joann to look for fabric. I was looking for something I could use to make a window treatment in the boy’s room. My mom found this little number and the green, yellow and brown combination was perfect. I had intentions of making faux roman shades as I did in this project so I bought enough fabric for 2 panels, the length of each window. However, while perusing through pinterest one day I saw this tutorial and thought it was totally adorable and totally do-able. I decided to build a cornice for the boy’s window instead. Because the fabric I bought was cut into 2 panels I had to sew a seam down the middle to make the fabric wide enough to fit the window. Simple. The rest of the project was just as easy. Neil found a board in the garage and cut it to the length we needed. I used a staple gun to wrap the board in batting and then in fabric. *TIP* My sister passed on a handy hint for recovering things. Always staple on the batting and the fabric separately. It does mean twice the staples BUT should you ever want to change the fabric you only have to remove the fabric layer while the batting stays intact, so you don’t have to redo the entire thing! Pretty smart.
After the long board was wrapped and stapled I covered the 2 side pieces and then Neil helped me fasten it all together with 2 L brackets. We then used 2 more L brackets to secure it to the window. Easy peasy. I’m not much of a tutorial maker (I always forget to take pictures of steps along the way!) so if you are completely lost and you’d like to see the tutorial I followed here is the link.
And here is the finished product. I’m pretty happy with how it turned out. I think it adds just enough detail to the room.


Because I took the pictures looking up it looks like the cornice doesn't quite cover the shade hardware at the top of the window. Let me assure you it does. We hung the cornice as low as possible, flush with the top of the window trim, making sure that it covered the top of the shades. If I were to make it again I would probably make the cornice a couple inches wider but I'm happy with this one regardless.
The best part is because the cornice did not use as much fabric as the roman shades would have I had a lot of fabric left over. Just enough in fact, to make 2 matching pillow cases for the beds. How great is that?
I'm just working on a few more touches and then the room will be complete! Stay tuned.
November 15, 2011
would I lie to you?
My brother in law introduced us to this show a few weeks ago and I'm sure not a single night has gone by that Neil and I haven't watched at least one, or twelve, episodes. If you think funny stuff is funny, then you'll like this show. I laugh out loud every time we tune in. It's brilliant (I said that cause it's British).
It's a show on the BBC called Would I Lie to You? There is a panel of 6 contestants and 1 host. In turn each person reads a card with a statement on it. The statement may be a truth or a complete lie yet the person reading the card must convince the others it is indeed accurate. The other contestants ask questions to determine whether they think the statement is fact or fiction. The premise alone is funny but it is the sarcasm and mockery (nevermind the British accents) that get me howling.
Here is a segment from one of the episodes. They can all be found on YouTube, with some under the name Wood Eye Lie Two U? Clever copyright evaders eh? Please, for the love of laughing go watch some.
*Oh, and if you are wondering how my shopping ban is going the answer is awesome. When I was grocery shopping the other day I turned away from the discount Halloween candy that was on for mere pennies and when I received an email about cute boots going on sale I just added them to my Christmas wish list instead of buying them on the spot. And finally, while in Edmonton this week I am not even going to step foot in MAC or Sephora. Seriously. So how's that? I know, my arm hurts from patting myself on the back.
It's a show on the BBC called Would I Lie to You? There is a panel of 6 contestants and 1 host. In turn each person reads a card with a statement on it. The statement may be a truth or a complete lie yet the person reading the card must convince the others it is indeed accurate. The other contestants ask questions to determine whether they think the statement is fact or fiction. The premise alone is funny but it is the sarcasm and mockery (nevermind the British accents) that get me howling.
Here is a segment from one of the episodes. They can all be found on YouTube, with some under the name Wood Eye Lie Two U? Clever copyright evaders eh? Please, for the love of laughing go watch some.
If you liked that, here's the second half.
And just in case your children are still sleeping here's another episode parts 1 and 2. Funny.
*Oh, and if you are wondering how my shopping ban is going the answer is awesome. When I was grocery shopping the other day I turned away from the discount Halloween candy that was on for mere pennies and when I received an email about cute boots going on sale I just added them to my Christmas wish list instead of buying them on the spot. And finally, while in Edmonton this week I am not even going to step foot in MAC or Sephora. Seriously. So how's that? I know, my arm hurts from patting myself on the back.
November 14, 2011
glow bath
This is something my boys have been loving for a few weeks and I thought I’d share. I originally saw this idea on pinterest (where else?) and tried it right away.
I bought a 10-pack of glow-sticks at my local Dollarama, brought them home, filled up the tub, cracked the sticks and threw them all in. When I turned off the lights my boys squealed in delight!! They usually play in the bath for quite a while but now it’s next to impossible to get them out of their glow baths! They may have had a glow bath 3 times in one day… haha!
Give it a try with your little ones, I’m sure it will be a hit. Heck, I think I’m going to try it myself! How relaxing.
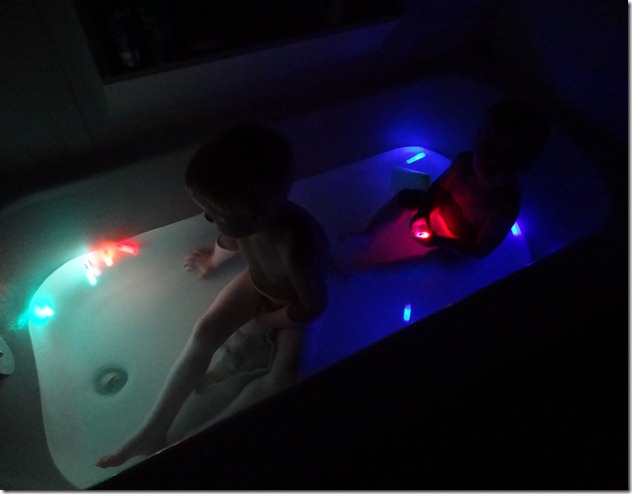
*TIP – you do not have to throw away the glow-sticks after each use. When you are done put them in the freezer and they will hold their glow until next time.
I bought a 10-pack of glow-sticks at my local Dollarama, brought them home, filled up the tub, cracked the sticks and threw them all in. When I turned off the lights my boys squealed in delight!! They usually play in the bath for quite a while but now it’s next to impossible to get them out of their glow baths! They may have had a glow bath 3 times in one day… haha!
Give it a try with your little ones, I’m sure it will be a hit. Heck, I think I’m going to try it myself! How relaxing.

*TIP – you do not have to throw away the glow-sticks after each use. When you are done put them in the freezer and they will hold their glow until next time.
November 9, 2011
I call them my Rigby hairs
Those of us that are moms understand the phenomenon that is hair growth and hair loss related to pregnancy. While we are pregnant we enjoy beautiful thick and healthy hair but shortly after baby arrives we endure nasty handfuls of hair clumps as all we gained now falls out. After my babies are born I shed like an angora sweater for months. Ge-ross.
Another thing I’ve noticed post-partum is the sprouting of new little baby hairs. I seem to get them right on my hairline, framing my face. At first they are inconspicuous little fuzz that hide nicely under the longer hairs. Soon they are not long enough to bury but stick straight up like little antenna on the top of my head. Beautiful. I sprouted some of these baby hairs after Rigby was born and this is what they currently look like. They have finally reached a length where they lay down but they still do their best efforts to stick straight out, or at least not blend in with whatever else is going on up there. I am terribly annoyed by my involuntary fringe and do my best to twist, pin, braid and slick them away. I await the day they have grown to the length of my shortest layer and at least look like they belong.

Tell me you experience this too?
Another thing I’ve noticed post-partum is the sprouting of new little baby hairs. I seem to get them right on my hairline, framing my face. At first they are inconspicuous little fuzz that hide nicely under the longer hairs. Soon they are not long enough to bury but stick straight up like little antenna on the top of my head. Beautiful. I sprouted some of these baby hairs after Rigby was born and this is what they currently look like. They have finally reached a length where they lay down but they still do their best efforts to stick straight out, or at least not blend in with whatever else is going on up there. I am terribly annoyed by my involuntary fringe and do my best to twist, pin, braid and slick them away. I await the day they have grown to the length of my shortest layer and at least look like they belong.

Tell me you experience this too?
November 8, 2011
no-shopping-November
Neil and I had the amazing opportunity of attending an 8 Pillars seminar this weekend. I wasn't especially thrilled about attending a financial seminar (yawn) but went with my husband anyway.
It. Was. Fantastic.
The author of the book "8 Pillars of Financial Greatness," Brian Nelson Ford himself, was the presenter. It was inspiring, informative, funny, educational, eye-opening AND they fed us lunch (love a free lunch).
I won't try and explain it all to you but if you want to check it out here is the link. Neil has read more of the book than I have but after the seminar I am excited to get into it. (I just said that. About a book.)
I'm not blogging about a financial seminar because I really think you're interested in hearing about it. I'm blogging about it so you can help me take responsibility for one of the goals I have set. After the seminar Neil and I discussed our finances and set ourselves some goals. I committed that I would not make a purchase for myself in the month of November. That means no clothes or shoes, no accessories, no makeup (besides some mascara - mine is reaching the end) and nothing for the house other than project supplies.
I decided that to help keep myself accountable I would let you know at the end of every post if I have been successful in achieving this goal. It's so easy for me to buy something on impulse (seriously, the clearance shoes are always size 6!!) but figured that if I had to come and blog about it I'd think twice before I took it to the till. Easy? Easy.
Thanks for being there.
It. Was. Fantastic.
The author of the book "8 Pillars of Financial Greatness," Brian Nelson Ford himself, was the presenter. It was inspiring, informative, funny, educational, eye-opening AND they fed us lunch (love a free lunch).
I won't try and explain it all to you but if you want to check it out here is the link. Neil has read more of the book than I have but after the seminar I am excited to get into it. (I just said that. About a book.)
I'm not blogging about a financial seminar because I really think you're interested in hearing about it. I'm blogging about it so you can help me take responsibility for one of the goals I have set. After the seminar Neil and I discussed our finances and set ourselves some goals. I committed that I would not make a purchase for myself in the month of November. That means no clothes or shoes, no accessories, no makeup (besides some mascara - mine is reaching the end) and nothing for the house other than project supplies.
I decided that to help keep myself accountable I would let you know at the end of every post if I have been successful in achieving this goal. It's so easy for me to buy something on impulse (seriously, the clearance shoes are always size 6!!) but figured that if I had to come and blog about it I'd think twice before I took it to the till. Easy? Easy.
Thanks for being there.
Subscribe to:
Posts (Atom)