I can't believe I haven't posted since last Monday! We were away for a good part of the week so I guess that makes sense. I love shopping in the States, I think I'm going to name my next baby Target, or tattoo the word to my forehead or something. Anywaywho.
I love this recipe, but love it even MORE after I got smart. I used to try and cook the meatballs in my frying pan, carefully turning each one over while trying to keep it held together only to have all but like 3 of them completely fall apart and be left with meat-fallen-aparts instead of meatballs. Oh. My. Gosh. I was dumb.
Moving on.
Porcupine Meatballs
1 lb hamburger
1 chopped onion
1/2 cup minute rice (it has to be minute rice if you are going to cook the meatballs in the oven.)
1 can tomato soup
1/2 can water
1 egg
salt and pepper
Mix hamburger, onion, egg and rice in bowl. Form into balls, place on a cookie sheet covered in tinfoil and bake in the oven (that's where I got smart!) When the meatballs are cooked put them in a frying pan and pour on the soup mixture (I usually add more tomato soup so there's a lot of sauce.) until the rice is cooked and they have simmered in the flavor! I serve this with mashed potatoes and always pour the extra sauce over them. Salt and pepper to taste.
Thanks for linking up, we've been enjoying many of your recipes and remember I've added a SAMM link on the sidebar -------> for easy referral. Have a great week!

December 6, 2010
November 29, 2010
Share A Meal Monday
I have always been really impressed when I go somewhere for dinner and there are homemade buns. I don't know why but I've always thought it takes a special talent and a lot of time to make buns. My BFF gave me this recipe (hi Shar!) and I love her for it. This is an easy and delicious recipe for homemade dinner rolls and it doesn't take a lot of talent or even much time. Now I can impress dinner guests and I haven't even done anything that spectacular! Give it a try.
Mix 2 cups of flour with yeast. Beat egg, sugar, water and oil together in a separate bowl. Add this to flour mixture and beat well. Add remaining flour and salt. Let rise 15 minutes then punch down. Let rise 15 more minutes and them make into buns. If desired dip tops in melted butter. Let rise one hour. Bake at 375 for 15 to 20 minutes.
2 Hour Buns
4 cups flour
1 Tbsp fast rising yeast
1 egg
1/4 cup sugar
1 1/2 cups warm water
3 Tbsp oil
1/2 tsp salt
November 27, 2010
shopping
Yesterday Porter and I were playing "grocery store" and I have to write down how the whole thing went. He said some really funny things and if I don't get them down now I'll forget.
When we play grocery store or "shopping" we take a few items from the cupboards, a small basket, some fake money (Canadian Tire cash - really, what else is it good for?) and Porter's play American Express card. One of us works the till and the other one shops then comes up to pay. Porter and I take turns and yesterday Porter told me he wanted to be "Sutil" (at the till). For those that don't know Sutil is a Formula 1 driver and F1 pretty much reigns over our household.
While I was shopping I asked him what his store was called and he thought for a second and said, "We're No Cyclops." I said ok then (???) and asked him if he carried peanut butter at his store. He said "no, sorry, you should check Superstore or Costco." (Don't forget his little lisp.) And then told me that his store carried lots of other things like elephants, dinosaurs and skate boards.
After a while we traded and I was at the till and he was shopping. He asked me if we carried Mini Wheats and "rashed potatoes" so I showed him where they were and then he came to pay. He swiped his own credit card and then packed his groceries out to his car (the coffee table in the living room). While he was putting them into the trunk he stopped and said "oh, my back hurts!" (At which point I about died, how many times has he heard me say that?!!?) He then drove off to unpack them into his house.

Isn't being a mom (most days!) great?!
November 26, 2010
My Living Room
This post is mainly for my momma, she had no idea how a yellow dresser was going to fit into my living room. I promised her it would so now I'm going to prove it! :)
When I decided to paint my dresser mustard yellow there was not a speck of mustard yellow in my living room, not any. I knew I was going to have to tie it in somehow and when you don't want to buy all new furniture and drapes, what's the easiest way to add some color? Throw pillows. I bought some great fabric that had mustard yellow and also the burgundy color I already had in my living room. I also bought some felt to sew up a couple pillows I had seen online. I got busy and sewed, sewed, sewed!


I followed the second pattern on this tutorial to make this pillow. It's apparently another Pottery Barn knock off like the first pillow I made. It's not exactly the same but I am happy with how mine turned out.

I wanted to also tie in a little more of the turquoise that is in the pillows and I had this metal vase that I've actually never loved so I pulled out some leftover paint from this project and painter her up.


I also purchased this great turquoise throw for $10.


I added some cute vases to the dresser. I like the color and like the simplicity of the pair.


Then I called it DONE! It's just a few additions but I think it's cohesive and definitely a lot more colorful. AND the yellow dresser TOTALLY fits in! Right mom?!


November 25, 2010
dresser transformation
Ok folks, here it is - my dresser make over! I will try to keep the text minimal because well as they say, a picture is worth a thousand words, and I took a lot of photos to document my steps.

I had to decide if I wanted to use oil or latex paint. I decided to go with latex mainly because with the sudden onset of winter I had to do this project inside and oil paint is very smelly and very hard to clean up. I laid out a flat sheet to cover my carpet, put her on a piece of plywood and began to sand.

Initially I was going to take a belt sander to it all but Cynthia (my SIL and paint advisor) informed me I didn't need to do a major sand job but only needed to scuff up the surface to take the gloss off. It only took me about 20 minutes to sand the entire thing.

I wanted to keep the original key holes so I taped them off and then used an exacto knife to cut around them so that I could roll right over top without getting paint on them.


I washed the whole thing down well and then primed it all with my tinted primer. Once that was dry I was able to start painting the yellow - very exciting!

I said I wanted a mustard yellow but didn't realize how close "Serengeti Song" actually was to well... mustard! I'm SUPER pleased with this color.

I did 2 coats and then let it sit for an entire day. It needed more but I wanted it to be good and dry before I painted again as I didn't want it to get gummy.

I was a little worried about how well this medallion would paint but I rolled right over it and it covered really well. I think having a great primer really helped.

I finally did another 2 more coats and let that dry for another day. When it wasn't tacky any more I put the drawers back in (don't worry I don't have them closed all the way), put the hardware back on and moved it back into place.

I am *THRILLED* with how it turned out. It is better than I had envisioned it. The color is perfect and it's exactly what I wanted.

I am so happy with it! It looks so much more modern, so much more "me," and really brightens up the room.


Come back tomorrow and I'll show you the rest of the room and how her new look is fitting in nicely.
So remember her? This is how the old girl looked when I decided she needed a little rejuvenation.

I had to decide if I wanted to use oil or latex paint. I decided to go with latex mainly because with the sudden onset of winter I had to do this project inside and oil paint is very smelly and very hard to clean up. I laid out a flat sheet to cover my carpet, put her on a piece of plywood and began to sand.

Initially I was going to take a belt sander to it all but Cynthia (my SIL and paint advisor) informed me I didn't need to do a major sand job but only needed to scuff up the surface to take the gloss off. It only took me about 20 minutes to sand the entire thing.

I wanted to keep the original key holes so I taped them off and then used an exacto knife to cut around them so that I could roll right over top without getting paint on them.


I washed the whole thing down well and then primed it all with my tinted primer. Once that was dry I was able to start painting the yellow - very exciting!

I said I wanted a mustard yellow but didn't realize how close "Serengeti Song" actually was to well... mustard! I'm SUPER pleased with this color.

I did 2 coats and then let it sit for an entire day. It needed more but I wanted it to be good and dry before I painted again as I didn't want it to get gummy.

I was a little worried about how well this medallion would paint but I rolled right over it and it covered really well. I think having a great primer really helped.

I finally did another 2 more coats and let that dry for another day. When it wasn't tacky any more I put the drawers back in (don't worry I don't have them closed all the way), put the hardware back on and moved it back into place.

I am *THRILLED* with how it turned out. It is better than I had envisioned it. The color is perfect and it's exactly what I wanted.

I am so happy with it! It looks so much more modern, so much more "me," and really brightens up the room.


And for all you BEFORE and AFTER junkies, here you go!
BEFORE
AFTER
Come back tomorrow and I'll show you the rest of the room and how her new look is fitting in nicely.
November 23, 2010
my boy's room
One of the real pains-in-the-butt (there are about 3 bazillion of them) about living far away from people is that when you make minor changes (with major affects, of course!) to a room they are familiar with you have to just describe it to them instead of have them come over to oooh and aaah at your new hand towels or to agree that that picture does look better hung 3 inches lower. Ya know? So when I recently purchased a dresser from my friend Laura (who bought a "new" dresser she is going to make over - eek!) and moved it into the boys room I wanted to show my mom and sister what a great addition it made buuuuut they live 12 hours away. When I also bought Porter a new duvet I decided it was best to just take pictures of the whole room and show them how it had come together. Anyway, here are the changes to the room for my little men.


The new dresser. It matches the other furniture perfectly and holds so much more than the small change table/dresser I was using. I also purchased that adorable wicker laundry hamper for some clothing-control and it's awesome.

I did have to move my rocker over slightly but it's fine where it is.

Beside the dresser/rocker I keep my blanket folded up in this cute basket, ready for me to pull on while I nurse my babe. A place for everything makes mommy very happy.

I added this cute little wicker waste basket as well. It's functional and matches the laundry hamper.
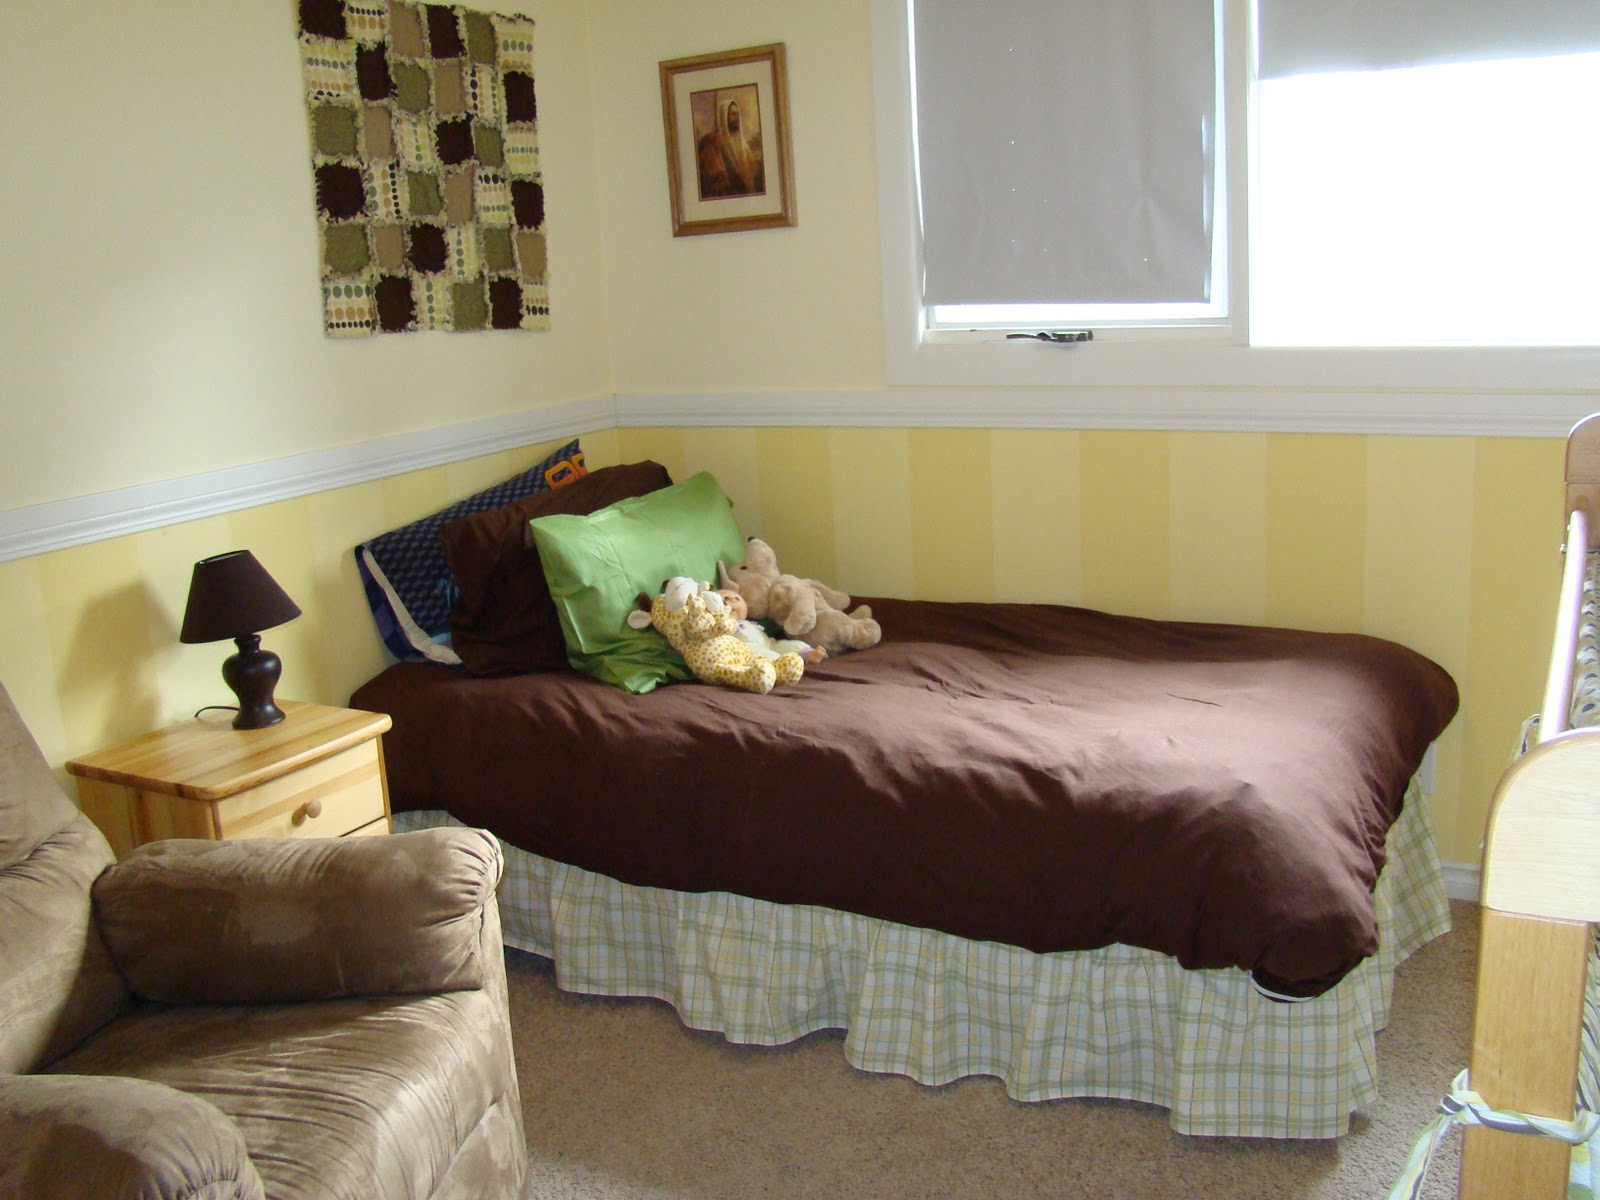
Here's the new duvet. Really nothing special but it's better than the yellow one I had in here before. Every time I came in the room I got a sudden bout of jaundice.

Here's the crib as always - even though it still says Porter above it. I hoped the Rigby blocks on the dresser would counteract that.

I didn't have anywhere to keep diapers and wipes with the change table taken out of the room so I put them all in this cute basket which I just slide under the crib.
So there you have it ladies. Not as good as having you here *sigh* but it will do.
November 22, 2010
Share A Meal Monday
So who doesn't love breakfast for dinner right? I know we all take the easy road once in a while and make eggs and sausage or waffles or pancakes. Well I have an AWESOME recipe for pancakes and since I made them yesterday for the first time in a couple months (why do I do that?!) I thought that's what I would share today.
Pancakes
1 1/2 cups flour
1/3 cup oats
3 Tbsp sugar (I always do 1/2 of the 1/3 cup - it's roughly the same)
1/4 tsp salt
1 1/2 tsp baking powder
1/4 cup oil
2 eggs
1 1/3 cup milk
1/3 cup water
Mix dry ingredients in a large bowl. In another bowl mix wet ingredients (not the water yet) together and then add to the other bowl. Fold until well mixed. When mixed add water and mix again. Cook on griddle at 300 F.
November 19, 2010
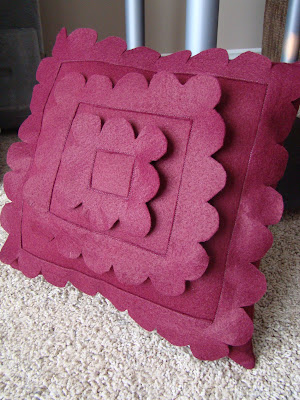
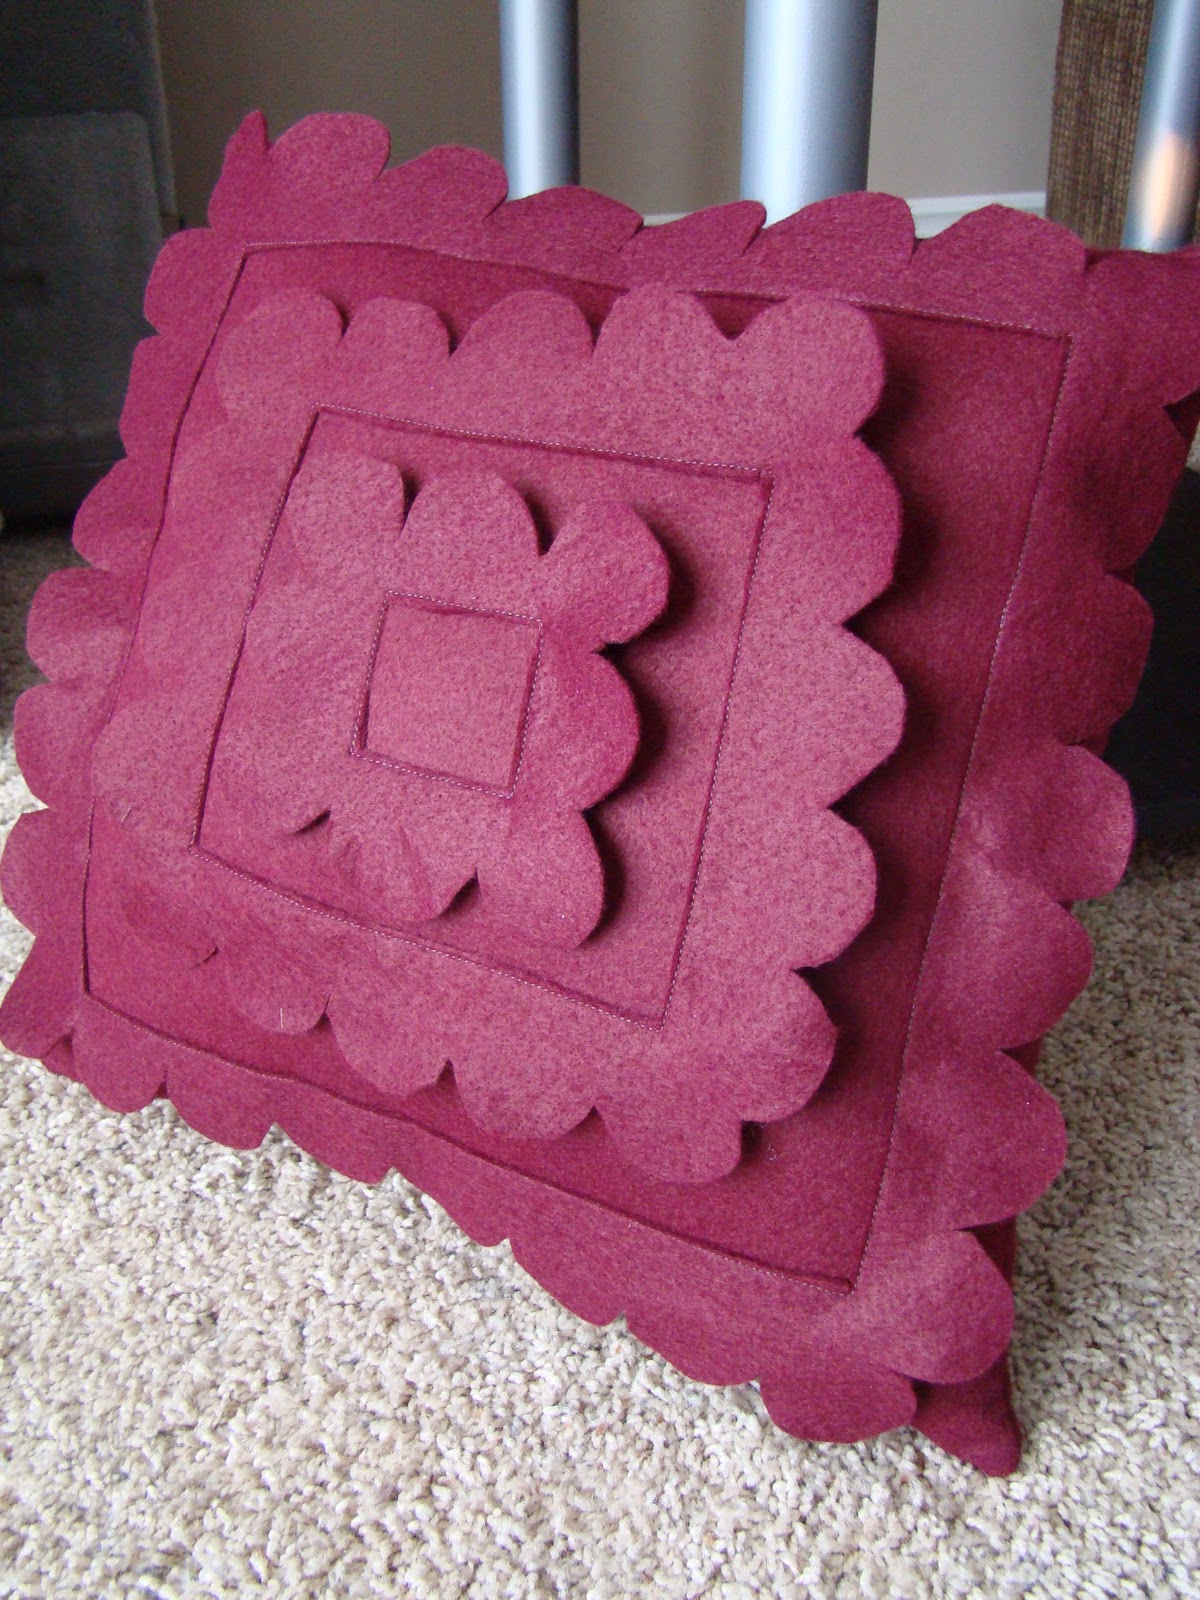
felt pillow
When I decided to paint my dresser (which is happening this weekend I hope!!) I decided to sew some pillows in coordinating colors to tie the room together. I bought some cute patterned fabrics but wanted something more. My sister and I had both seen this tutorial and thought it would be the perfect compliment to the pillows I was going to sew. When I told Laura about it she sent me over to this tutorial as well. Apparently they are Pottery Barn knockoffs but don't judge me for saying it, I know nothing about Pottery Barn - well, other than these pillows which I think are cute. Anyway, before I show you the completed room next week I have to show you how this pillow turned out today. It's not perfect which would normally really bother me but I think it adds to her charm.
She's just precious.

She's just precious.

November 18, 2010
a cute craft and an embarrassing story
The Cute Craft
The other evening I went over to my good friend Stephanie's house where a few girls were getting together to make this:

Just paint a clay pot, hot glue a rose bowl to it and use the bottom of the pot for the lid. We had a friend print some vinyl to say "treats" but you could stencil it if you don't have access to vinyl. Both the pot and the bowl are from the dollar store so it's cheap, easy and super cute! Now to keep little hands out of it.....
The Embarrassing Story
My friend Steph painted her pot black as her kitchen decor is all black and white, and then put her vinyl on the bowl since you wouldn't be able to read it on the black pot. The next day I went to her house and as I walked in the door she was telling me how she had gone out that morning to buy some white paint because she wasn't happy with the plain black pot. She had just finished painting white horizontal stripes all around the pot to jazz it up a little. I took my shoes off and walked over to her pot to have a closer look. I told her it looked darling and the stripes really did add a lot. She said she wasn't sure if the stripes were straight enough but that they would do. I motioned to pick it up and then said "I probably shouldn't heft it." and she said "oh, it's strong, I've been carrying it all morning." (I know you know where this is going...) I picked it up by the bowl and as I did the little lid started to slide. I kinda jerked the bowl to try and catch the lid which broke the bowl from the pot. At the same time the lid went tumbling in one direction and the pot went in the other and they both landed on her kitchen floor and SHATTERED. I was left holding just the little bowl that said "treats." She bent over laughing and I stood there mortified. We had made these the night before and she had just finished hers that day, her husband hadn't even seen it yet! I clearly felt HORRIBLE but couldn't help laugh and still laugh out loud to myself whenever I think of it. Good thing she's a great friend and found the humor in it instead of being upset about her lost hard work.
Soooo if you'd like to make one, they are cute and easy and cheap and a little fragile. Just be careful.
November 16, 2010
Scarf
I bought Porter a new duvet cover but couldn't bear to throw away the old one and all of it's bright yellow jersey knit goodness. I stashed it away knowing I would think of the perfect project for it sometime.
A while ago I saw this tutorial and fell in love with it. I am such a scarf girl and love the raw-ness of this one. When I was down at my sister's in October I bought some cute heather grey jersey to make my own but when I pulled it out yesterday to finally make the scarf it was immediately obvious that I hadn't bought enough, like by a long shot. Soooooo I remembered Porter's duvet and thought it would be the perfect opportunity to cut it up.
I then made it into this:

I am SO pleased with how it turned out. It's warm, it's cute and it's re-purposed. Love it.
Subscribe to:
Posts (Atom)